


💊 Pill of the Week
Large Language Model (LLM) agents can make decisions about when to use external tools as part of answering a question.
We covered AI Agents in this previous issue:

Let’s now cover the most basic agent: ReAct agent. The ReAct (Reasoning and Acting) style agent operates in a loop of:
thinking (reasoning with the LLM)
acting (calling a tool or API)
observing (incorporating the tool's result)
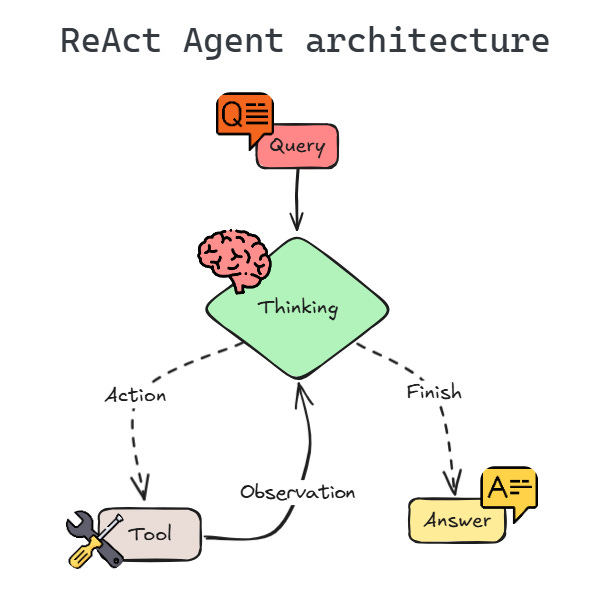
This allows the agent to handle queries that the LLM alone might not answer, by dynamically invoking tools for additional information. For example, if asked “What’s the GDP of Spain in 2024?”, a ReAct agent could decide to call a Wikipedia search tool to fetch the latest data.
In this issue, we will build a simple ReAct-style agent from scratch using LangGraph (LangChain's graph-based framework) and LangChain in Python.
We will not use any pre-built agent utilities; instead, we'll explicitly define the agent's graph nodes and conditional edges. The agent will be able to use a Wikipedia search tool automatically when needed.
In this issue, we will cover a Stateless Agent (single-turn), which is a minimal ReAct agent that answers one question at a time without conversation memory. However, in future articles we will also cover a Stateful Agent (with memory) - an extension that keeps track of the conversation history so it can handle follow-up questions.
Let's get started by setting up our environment and then implementing the agent step by step.
Setup
First, install the required packages and set up any API keys. We'll use LangGraph (part of LangChain for building graph-based LLM workflows), LangChain's OpenAI chat model wrapper, and the wikipedia package for the Wikipedia search tool.
!pip install -U langgraph langchain-openai wikipediaThis imports the necessary classes and functions:
LangChain’s chat model (we'll use OpenAI's GPT-4o for demonstration via
ChatOpenAI),LangChain’s tool decorator (
@tool) to define our custom tool,LangGraph’s components for building the state graph,
Message classes for constructing the conversation state.
from langchain_openai import ChatOpenAI
from langchain_core.tools import tool
from langgraph.graph import StateGraph, END
from langchain_core.messages import BaseMessage, SystemMessage, ToolMessage
Note: You will need an OpenAI API key if using
ChatOpenAI. Make sure to setOPENAI_API_KEYas an environment variable or viaos.environbefore running the agent, or directly passing through theapi_keyargument. Alternatively, you could use a local or open-source model with a similar interface.
Now, let's implement the agent!
Agent
In this section, we build a minimal ReAct agent that can answer one question (with tool use if needed) and does not retain any memory of previous interactions. The agent will use the LLM to decide on actions and will handle the reasoning-action loop for a single query.
We will implement the agent step by step:
Define the agent's state – the data structure representing the agent's memory or context (for a stateless single-turn agent, this will just include the current conversation messages).
Set up the LLM and tool – initialize the language model and define a Wikipedia search tool using the
wikipediapackage. Give tools access to the model.Define LangGraph nodes and edges – create the reasoning node (LLM call), the tool node (executes the tool), and a conditional edge that decides whether to continue the loop or end it, based on the LLM's output.
Compile and run the graph – combine the nodes into a
StateGraph, then test the agent on a sample question to see it in action.
1. Defining the State Model
LangGraph uses a state object to keep track of the conversation and any intermediate data. For a basic ReAct agent, the state can be as simple as a list of messages (chat history). We define a TypedDict for the state with a single key "messages" that will hold a sequence of messages. We also attach a reducer add_messages to this field – this ensures that when we return new messages from a node, they get appended to the state’s message list (instead of overwriting it).
from typing import TypedDict, Sequence, Annotated
from langgraph.graph.message import add_messages

class AgentState(TypedDict):
    """State of the agent for one turn or conversation."""
    messages: Annotated[Sequence[BaseMessage], add_messages]
Here, AgentState["messages"] will contain a sequence of chat messages (from system, user, AI, or tool). For a single-turn stateless agent, we'll initialize this with just the latest user question (and a system prompt internally).
2. Setting up the LLM and Wikipedia Tool
Next, initialize the LLM and define our tool. We use ChatOpenAI from LangChain to create a chat model instance. For demonstration, we'll use the "gpt-4o" model (which supports OpenAI's function calling), but you can use any model available (as long as it is compatible with tools calling).
We then define a Wikipedia search tool using the @tool decorator. This decorator turns a Python function into a LangChain tool that the agent can call. Our tool function will take a search query string, use the wikipedia library to fetch a summary of the top result, and return that summary text. The docstring of the function serves as the tool’s description for the LLM.
# Initialize the chat model (LLM) - make sure your API key is set
model = ChatOpenAI(model="gpt-4o", temperature=0, api_key=OPENAI_API_KEY)

# Define a Wikipedia search tool
import wikipedia

@tool
def wiki_search(query: str) -> str:
    """Search Wikipedia for the query and return a brief summary of the top result."""
    try:
        # Fetch summary of top search result (we set it to 5 sentences)
        summary = wikipedia.summary(query, sentences=5)
        return summary
    except Exception as e:
        return f"Error: {e}"
We set a low temperature for the model to minimize randomness, since we want it to reliably produce tool calls for unknown facts. If the API key was not set in the environment you also need to pass it as an argument.
The wiki_search tool uses the Wikipedia API (via the wikipedia package) to get information. For example, if asked about a person or event not known to the model, the agent can call wiki_search to get up-to-date info. This is a common pattern – Wikipedia tools are often used to fetch summaries for factual questions. For this example we set the number of sentences of the summary to 5, but that is something that can be changed according to your application needs.
3. Defining the LangGraph Nodes and Conditional Logic
Before defining the graph, let’s prepare the tools so the model can access them:
import json

# Map tool name to the tool function for easy lookup
tools = [wiki_search]
tools_by_name = {tool.name: tool for tool in tools}

# Give the model access to the tools
model = model.bind_tools(tools)
With the model and tool ready, we create the nodes of our agent's computation graph:
Reasoner Node (LLM call): This node will call the LLM to either produce an answer or decide on a tool action. We’ll implement it as a function
call_model(state). It takes the current state (which contains the conversation messages so far) and returns the LLM's response as a new message. We include a system prompt to guide the LLM’s behavior (e.g., “You are a helpful assistant…”). The user’s query is in the state’s messages. We invoke the model with the system prompt plus all existing messages. LangChain’sChatOpenAIcan return a message that includes a function call if the model decides a tool is needed (under the hood, the model may use OpenAI’s function calling feature to requestwiki_search).
def call_model(state: AgentState):
    """LLM reasoning node: call the chat model with system prompt + conversation."""
    system_prompt = SystemMessage(content="You are a helpful AI assistant. If needed, you can use the wiki_search tool to build your answer.")
    # Call the chat model with system + existing messages (user question is included in state["messages"])
    response = model.invoke([system_prompt] + list(state["messages"]))
    # Return the response as a list (to be appended to state's messages via reducer)
    return {"messages": [response]}
Tool Node (execute tool): This node executes any tool that the LLM requested. We implement
tool_node(state)to inspect the latest message from the LLM for a tool call. If a tool call is present, we invoke the corresponding tool function and package its result into a special ToolMessage. The ToolMessage will be added to the state so the LLM can see the tool’s output on the next iteration.
def tool_node(state: AgentState):
    """Tool execution node: execute any tool calls the LLM asked for."""
    outputs = []
    # Check the last message from the LLM for tool calls
    last_message = state["messages"][-1]
    if hasattr(last_message, "tool_calls") and last_message.tool_calls:
        # If the model requested one or more tool calls, execute each
        for tool_call in last_message.tool_calls:
            tool_name = tool_call["name"]
            tool_args = tool_call["args"]
            if tool_name in tools_by_name:
                # Invoke the corresponding tool function with provided arguments
                result = tools_by_name[tool_name].invoke(tool_args)
            else:
                result = f"Tool '{tool_name}' not found."
            # Wrap the result in a ToolMessage for the LLM to read
            outputs.append(
                ToolMessage(
                    content=json.dumps(result),   # tool result as JSON string
                    name=tool_name,
                    tool_call_id=tool_call.get("id")  # use id if provided
                )
            )
    # Return the tool outputs to be added to messages
    return {"messages": outputs}
Conditional Edge (
should_continue): After each LLM reasoning step, we need to decide whether the agent should end with an answer or continue by using a tool. We define a functionshould_continue(state)that checks the LLM's last message. If the LLM did not request any tool (no function call), that means it produced a final answer, so the agent can end. If a tool was requested, we should continue to the tool node next. This function will return a flag (e.g.,"continue"or"end") that LangGraph uses to choose the next node.
def should_continue(state: AgentState) -> str:
    """Decide whether to continue the ReAct loop or end it, based on last LLM message."""
    last_message = state["messages"][-1]
    print(last_message)
    # If the LLM's last message did not request a tool, we're done
    if not (hasattr(last_message, "tool_calls") and last_message.tool_calls):
        return "end"
    else:
        # There is a tool request, so continue to the tool node
        return "continue"
A few notes on this implementation:
In
call_model, we prepend a system message that defines the assistant's role and hints that it can use thewiki_searchtool if needed. We then pass all messages (including the user's message) to the chat model. The model may return a normal AI message (with a direct answer) or a function/tool call message. LangChain'sChatOpenAIwill automatically format the function call request in a structured way if the model decides to use a tool.In
tool_node, we look atlast_message.tool_calls. LangChain’s message objects have atool_callsattribute that contains any tool/function call requests the model made. If there's a tool call, it includes the toolnameandargs. We invoke the appropriate tool from ourtools_by_nameregistry. The result is wrapped in aToolMessagewhich includes the tool’s name and outputs. By returning{"messages": [ToolMessage(...)]), LangGraph's reducer will append this tool result message to the state’s messages list.should_continueexamines the last message. Iftool_callsis empty, the LLM didn't ask for any action – meaning it likely produced a final answer – so we return"end". If there's a tool call, we return"continue", signaling the graph to proceed to the tool execution step. These return strings will be used to choose the next node via a conditional mapping.
🎓Further Learning*
Let us present: “From Beginner to Advanced LLM Developer”. This comprehensive course takes you from foundational skills to mastering scalable LLM products through hands-on projects, fine-tuning, RAG, and agent development. Whether you're building a standout portfolio, launching a startup idea, or enhancing enterprise solutions, this program equips you to lead the LLM revolution and thrive in a fast-growing, in-demand field.

Who Is This Course For?
This certification is for software developers, machine learning engineers, data scientists or computer science and AI students to rapidly convert to an LLM Developer role and start building
*Sponsored: by purchasing any of their courses you would also be supporting MLPills.
4. Constructing and Compiling the Graph
Now we assemble the graph using LangGraph’s StateGraph. We add our two nodes ("agent" for the LLM reasoning and "tool" for the tool execution), set the entry point, and define the transitions. The critical part is adding a conditional edge from the LLM node to either the tool node or the end of the graph, based on should_continue function's output. We will map the "continue" signal to the "tool" node, and the "end" signal to END (a special marker indicating the graph should terminate). We also add a normal edge from the tool node back to the LLM node, creating a cycle: after using the tool, the agent goes back to the LLM to incorporate the new information.
Keep reading with a 7-day free trial
Subscribe to Machine Learning Pills to keep reading this post and get 7 days of free access to the full post archives.